Yearbook PDF Specifications
Quick Tips
Important things to know when creating your PDF file.
 Page Setup
Our pages start on the right, so keep this in mind when designing. Any 2-page spreads will need to start on page 2.
Learn More
 Color Space
We recommend using sRGB in your colorspace for the best printing results. Also, your PDF should have one colorspace throughout.
Learn More
 Margins
Softcovers and interior pages need a .25” margin around the edge without any important content in that space. Hardcovers require 1".
Learn More
 DPI
DPI
Make sure your DPI is set to 300 and try not to use lo-res images. You can double check pixelation by zooming in on your photos by 400%.
Learn More
6 Key Tips
- Create your full wrap cover and interior pages as two separate documents -- they are printed as separate documents.
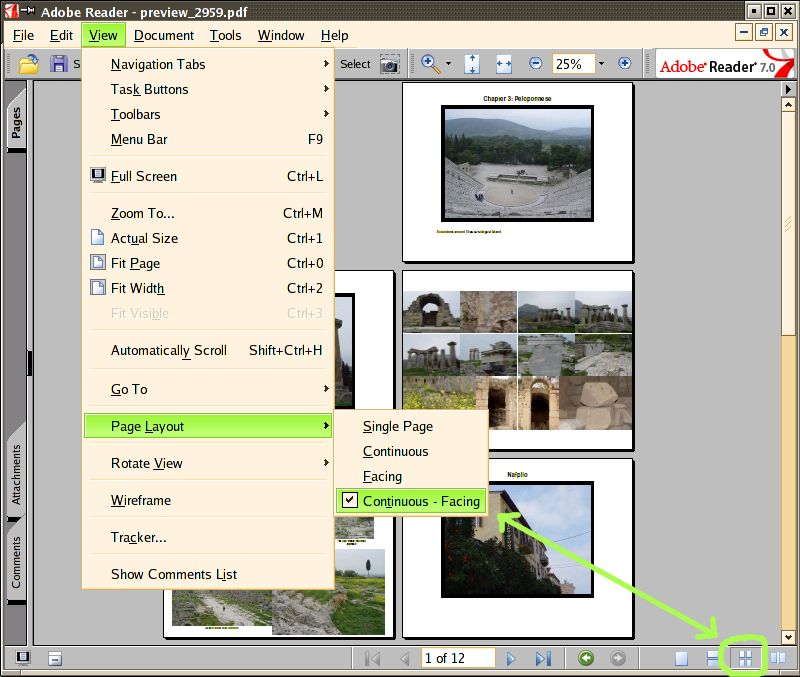
- For all books, page 1 always prints on the right, opposite the blank inside front cover. View continuous, facing pages in your PDF application to see how the *inside* of your book will print.
- We support the sRGB and CMYK color space for interior text blocks. We only support sRGB for cover files. Your cover must be uploaded as a separate file.
- Make your PDF +.25" (+7mm) larger than your desired book size.
- There should be no crop marks in your PDF. Our process automatically trims up to 1/4" from each edge. Perfect bound books trim 1/8" from every edge, and hardcover books trim up to 1/4" from every edge. We recommend all important visual elements are at least 3/4" (21mm) from the edges.
- When exporting to PDF, your file must be compatible with Acrobat 6 (PDF 1.5) or higher.
*NOTE* PDF 1.3 and 1.4 may work, However, with older formats, files with transparencies and layers may have issues. If your PDF file is 1.4 or lower and the fonts or transparencies don't print properly we will NOT reprint the book. A particular problem is images with layers and transparencies will be placed as transparent elements into the PDF. The printer software (known as a RIP) does not process all transparencies properly which may result in an unsatisfactory print, even if the same PDF prints properly on your home printer or computer screen. We recommend PDF 1.5 for files with heavy layering and transparencies.
Here is a list of PDF Creation Software that can convert documents to press-ready PDFs.
 Our Favorite Creation Software
Below are the softwares that we've had the best experiences with as far as PDF output and printing compatibility. You can check out their specific help pages by clicking the name, or see all the options by clicking on "See All". Happy creating!
PDF FAQ
Our recommended PDF creation software is Adobe Acrobat, Photoshop, or InDesign, as those programs are the most optimized for use in creating PDFs that are compatible for printing. Adobe offers a free PDF creator which allows you to create 5 free PDFs. We recommend your file be in its final form before you use one of the 5 conversions. You can find even more options at our PDF Creation Software page!
Golly, do we ever! We have a pretty top-notch help page on creating in InDesign and printing with us. We not only have words, we also have some pretty helpful infographics. That’s right, photo illustrations.
JPEG Files: - If a PDF file fails to RIP, and the error message is that this was due to an invalid JPEG Marker, and this is NOT due to a corrupt image Adobe Acrobat usually pops up a message if an image on a page is indeed corrupt then it is recommended that you use the "passthrough false" option when you are performing a load_image command.
PDFLib recommends you contact support when such an issue occurs, and provide the image that requires this "passthrough false" option, so that they can develop against this new jpeg flavor in future releases.
NOTE: CMYK, as placed by an iGen, from the Upper Surface to the lower Sheet of a printed document, ARE: MYCK. M, being on top, will be most noticeable. There is a free plugin for Acrobat called FontReporter, which is from PDFlib. You must have Acrobat and this plugin does not work with the Reader.
Yes and no. One of the biggest issues with using Microsoft Office products to make a PDF is that it is not necessarily optimized for high quality PDF printing. There is a chance of some of the formatting being a bit weird in printing and we recommend your PDF being at 1.7, but Microsoft generates a PDF of 1.3, 1.4, or 1.5. These are things that we can't necessarily see or check for before sending your book to print - there's only so much we can do! Please check out our help page on PDF creation with Microsoft Software for some more information. If you’ve used one of those options to create your PDF, you can try running it through a program like Foxit or another PDF Creation Software and then uploading it. If you’re still worried you can always contact us to double check!
- If your book has text, ALWAYS embed the full font family for all fonts within the document. Subsetted fonts over multiple pages may cause problems when your PDF is rasterized for print resulting in text printed with symbols instead of fonts, garbled text, or missing text. Technical Note: The RIP works to build a single font resource for a multiply subsetted font. But since that font has multiple definitions in the PDF, the font resource that the rip builds can be garbled from being overwritten over and over again. Further, The RIP might reject the font resource entirely and substitute Courier.
- Optimize for Fast WebView
- Set compatibility mode to Acrobat 6 or higher
- Leave the PDF colorspace in its original profile (Do not convert CMYK to sRGB or vice-versa).
- Image Compression: Color
- Zip, {lossless, but might create huge files}
- Use Jpeg High -> Low to lower filesize {Lossy, but reduces file size}
- Image Compression: BW
- Aways ZIP Grayscale images, do not use CCITT
- Do not downsample your images unless the images are fully rasterized. If fully rasterized and the DPI is greater than 300, downsample to 300.
- Compress text and Line Art
- Do not preserve OPI comments
- Certain PDF Tools such as Pitstop may have problems.
- File Sizes should be less than 2GBs. Keep in mind the larger the file, the longer it will take to upload.
- Overprint and Simulate Overprint should be turned off.
- USE CMYK or sRGB Colors in Paths that are below Transparencies. Spot colors that are below an images transparency might not print.
- Your final PDF should be one layer.
We love full wraps…kind of. We generally don’t recommend creating a full wrap cover but if you’re super motivated you can always try! We provide some great tools and downloadable templates for a few of our most popular sizes at our Book Cover Specifications page. Aptly named to tell you just what you need. :)
Absolutely, just be wary of the ever-present crop guides! We recommend a margin of at least .25” around the page where no important content (such as faces or marriage proposals) reside to avoid them being trimmed in production. We've also got some tips on how to set that up in your document:
- Set bleed @ 1/8" symmetric all around
- Have Optional Marks offset 10 points
- All intended bleeding elements must extend beyond the document size by at least 1/4" total in all directions (1/8" on each side) but do not include any important elements such as text or faces.
Be sure to check out our Cropping and Bleed page for more information!
- Do not change the colorspace of an image file, ie… if your original image file is in sRGB, DO NOT CONVERT to CMYK.
- Do not use images with CCITT compression.
- Do not use images with LZW compression. LZW compression may produce Multi-Strip Image files, especially on TIFF images.
- Do not use images that are Multi-Strip. Images must be continuous. Images that are Multi-Strip can print with lines between the strips.
- Do not use "Artificial" Grayscale, ie… sRGB or CMYK images with near matching channel values. If an image is meant to be Gray, its color space should be gray.
- The DocuSP is optimized to best print Grayscale images whose "Gamma" is between 2.2 and 2.4. If your Grayscale images have a Gamma of 1.8, they will print too dark.
- Image DPI, in its final document dimensions, should not exceed 600 dpi, and preferably should be about 300 DPI, to optimize RIP speed.
Now you want to set the image files in the PDF, right? Here's some tips:
- Image compression should be set to ZIP if you want lossless (no artifacts/distortion-free) images. To reduce file size, JPEG -> High should be used.
- If you are printing a color book with black and white images within it, the black and white images should have the colorspace set to greyscale. Artificial greyscale (sRGB or CMYK with near-matching channel values) can be printed with cyan or magenta hues within the image.
- Images should remain in their original profile (do not convert from CMYK to sRGB or vice versa).
- For greyscale images, use ZIP encoding. Do not use CCITT.
- The gamma of a greyscale image should be between 2.2 and 2.4
- The image DPI should be between 300 and 600 DPI (300 for smaller filesize)
- Do not use CCITT or LZW compression. LZW compression creates images which are multi-strip, and the printed result may have white lines between the strips of the image.
Uh oh, chances are you created your PDF in a different ratio than what you wanted. Generally, in this case you’ll need to go back to the drawing board (or PDF creation program) and adjust the size of your PDF to fit what you want. If you have questions about what size you’ll need to make your project you can always email us or hop on Live Chat!
Sounds like you might have saved your PDF using RGB images, rather than the recommended sRGB. It’s a pretty easy fix though! Just adjust the Colorspace in your PDF creation program to sRGB, save the file, upload over the existing project, and you should be all set! Check out our Color Specs page for some great information on this.